Instrukcje w GitHub Copilot - jak ustawić reguły dla AI na poziomie projektu, folderu i typu pliku
Prompt to za mało - potrzebujesz instrukcji
Pisanie dobrego promptu za każdym razem, gdy rozmawiasz z Copilotem, jest jak tłumaczenie nowego pracownika od zera przy każdym zadaniu. Zamiast tego - napisz mu onboarding raz i niech go zna na pamięć.
Właśnie do tego służą instruction files w GitHub Copilot: trwałe reguły, które model stosuje automatycznie przy każdej interakcji. Nie powtarzasz „używaj TypeScript strict mode” w każdym prompcie - piszesz to raz w pliku instrukcji.
Poziomy instrukcji
GitHub Copilot obsługuje instrukcje na trzech poziomach:
1. Repository-level - .github/copilot-instructions.md
Plik w katalogu .github/ Twojego repo. Stosowany automatycznie do wszystkich interakcji Copilot w tym projekcie.
# Project Instructions for Copilot
## Tech Stack- ASP.NET Core 9 with C# 13- Entity Framework Core 9 with PostgreSQL- Clean Architecture (Domain, Application, Infrastructure, API layers)
## Code Style- Use file-scoped namespaces- Use primary constructors where possible- Prefer records for DTOs and value objects- Always use async/await for I/O operations
## Naming Conventions- Interfaces: IPrefixed (IOrderRepository)- Commands/Queries: VerbNounCommand (CreateOrderCommand)- Handlers: VerbNounHandler (CreateOrderHandler)
## Testing- Use xUnit with FluentAssertions- Use NSubstitute for mocking- One assertion per test method
Kiedy używać: Dla reguł obowiązujących w całym projekcie - stack technologiczny, konwencje, architektura.
2. User-level - VS Code Settings
Osobiste instrukcje, które obowiązują we wszystkich Twoich projektach:
{ "github.copilot.chat.codeGeneration.instructions": [ { "text": "Always add XML documentation comments to public methods" }, { "text": "Use guard clauses instead of nested if statements" } ]}Kiedy używać: Dla Twoich osobistych preferencji kodowania, niezależnych od projektu.
3. Scoped instructions - zawężanie do folderów i typów plików
I tu robi się naprawdę ciekawie. Od niedawna Copilot pozwala scopować instrukcje do konkretnych części projektu.
Scoped Instructions - instrukcje celowane
Zamiast jednego globalnego pliku, możesz tworzyć instrukcje, które aktywują się tylko wtedy, gdy pracujesz z konkretnymi plikami lub folderami.
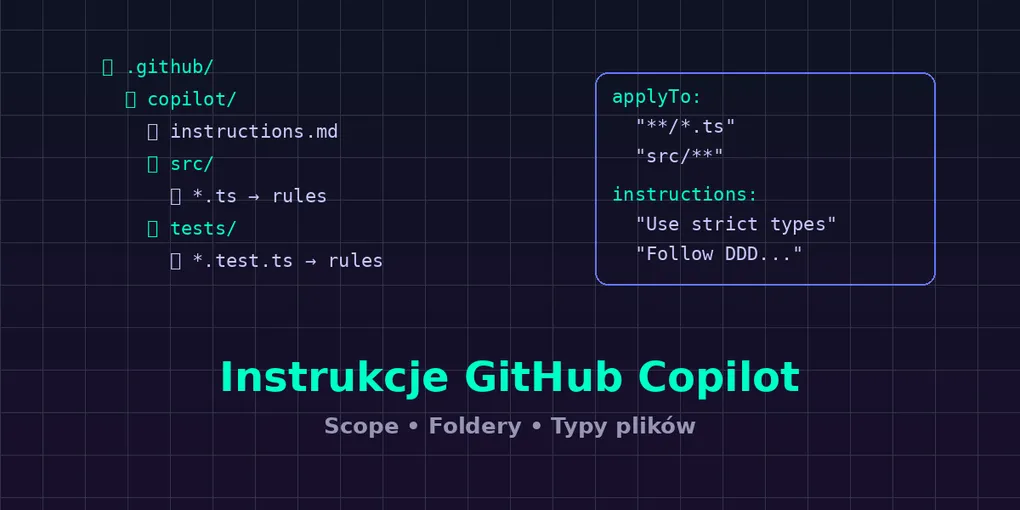
Sposób 1: Pliki .instructions.md z metadanymi applyTo
Tworzysz pliki .instructions.md w folderze .github/instructions/:
---applyTo: "src/API/**"---
# Backend API Instructions
- Use MediatR for CQRS pattern- Every endpoint must have request validation via FluentValidation- Return ProblemDetails for error responses (RFC 7807)- Use cancellation tokens in all async methods---applyTo: "**/*.test.ts,**/*.spec.ts,**/*.Tests/**"---
# Test Instructions
- Follow Arrange-Act-Assert pattern- Use descriptive test names: MethodName_Scenario_ExpectedResult- Never use Thread.Sleep in tests - use async waiting- Each test class should test exactly one class---applyTo: "src/components/**/*.tsx"---
# React Component Instructions
- Use functional components with hooks- Props interface must be explicitly defined (no inline types)- Use React.memo only when profiling shows re-render issues- Prefer composition over prop drillingSposób 2: Instrukcje per typ pliku w VS Code settings
W settings.json możesz przypisać instrukcje do konkretnych wzorców plików:
{ "github.copilot.chat.codeGeneration.instructions": [ { "text": "Use Tailwind CSS classes, never inline styles", "applyTo": "**/*.tsx" }, { "text": "Write migrations using raw SQL, not EF Core fluent API", "applyTo": "**/Migrations/**" }, { "text": "Use structured logging with Serilog. Include correlation ID in every log.", "applyTo": "src/Infrastructure/**" } ]}Praktyczne przykłady scope’owania
Przykład 1: Różne reguły dla backendu i frontendu
.github/ instructions/ api.instructions.md → applyTo: "src/API/**" domain.instructions.md → applyTo: "src/Domain/**" react.instructions.md → applyTo: "client/**/*.tsx" styles.instructions.md → applyTo: "**/*.css"Efekt: Copilot generuje C# z Clean Architecture w backendzie i React z Tailwindem na froncie - bez konfliktu reguł.
Przykład 2: Instrukcje dla plików konfiguracyjnych
---applyTo: "**/*.bicep,**/*.tf,**/docker-compose*.yml"---
# Infrastructure Instructions
- Use parameterized values, never hardcode secrets- Tag all resources with: environment, team, cost-center- Use managed identities instead of connection strings where possible
Przykład 3: Specjalne reguły dla migracji bazy danych
---applyTo: "**/Migrations/**"---
# Database Migration Rules
- Every migration must be reversible (implement Down method)- Use raw SQL for complex operations- Add data migration scripts in separate migrations from schema changes- Always set appropriate column sizes (no nvarchar(max) without reason)
Jak instrukcje współpracują z promptami
Instrukcje nie zastępują promptów - wzmacniają je. Wyobraź sobie warstwowy system:
┌─────────────────────────────┐│ Twój prompt (chat/inline) │ ← Konkretne zadanie├─────────────────────────────┤│ Scoped instructions │ ← Reguły dla tego folderu/pliku├─────────────────────────────┤│ Repository instructions │ ← Globalne reguły projektu├─────────────────────────────┤│ User instructions │ ← Twoje osobiste preferencje└─────────────────────────────┘Copilot bierze pod uwagę wszystkie warstwy jednocześnie. Jeśli piszesz prompt „dodaj endpoint”, to model:
- Stosuje Twoje osobiste preferencje (user)
- Zna stack i architekturę projektu (repo)
- Wie, że w tym folderze obowiązują reguły API (scoped)
- Wykonuje konkretne zadanie z promptu
Dobre praktyki tworzenia instrukcji
✅ Bądź konkretny
<!-- ✅ Dobrze -->Use primary constructors for services with up to 3 dependencies.For more dependencies, use traditional constructor with readonly fields.
<!-- ❌ Źle -->Write clean code.
✅ Dawaj przykłady
## Error Handling Pattern
Always use Result pattern instead of exceptions for business logic:
// Good:public Result<Order> CreateOrder(CreateOrderCommand cmd) { ... }
// Bad:public Order CreateOrder(CreateOrderCommand cmd) { throw new ... }
✅ Instrukcje negatywne
## Do NOT
- Do not use var for non-obvious types- Do not catch generic Exception - always catch specific types- Do not use string interpolation in log messages (use structured logging)
✅ Utrzymuj aktualność
Instrukcje to żywy dokument. Gdy zmieniasz stack, architekturę lub konwencje - zaktualizuj instrukcje. Nieaktualne instrukcje są gorsze niż ich brak, bo prowadzą do sprzecznego kodu.
Instrukcje w innych narzędziach AI
Ten sam koncept działa w innych narzędziach:
| Narzędzie | Plik instrukcji | Scope |
|---|---|---|
| GitHub Copilot | .github/copilot-instructions.md | Repo + folder + file pattern |
| Claude Code | CLAUDE.md | Repo + subfolder CLAUDE.md files |
| Cursor | .cursor/rules | Projekt |
| Windsurf | .windsurfrules | Projekt |
| Aider | .aider.conf.yml | Projekt |
Podsumowanie
Instrukcje to mnożnik siły Twoich promptów. Zamiast powtarzać kontekst w każdej rozmowie, ustaw go raz na poziomie projektu. Scopowane instrukcje idą krok dalej - pozwalają mieć różne reguły dla różnych części kodu, co jest kluczowe w projektach full-stack i monorepo.
Zacznij od prostego .github/copilot-instructions.md ze stackiem i konwencjami. Potem dodawaj scopowane pliki w miarę, jak odkrywasz, że różne części projektu wymagają różnych reguł.
Następny krok: Poznaj MCP (Model Context Protocol) - sposób na podłączenie AI do zewnętrznych danych i narzędzi, takich jak baza danych czy przeglądarka.
Chcesz opanować GitHub Copilot od podstaw?
Kurs GitHub Copilot - 5 poziomów, 15 modułów, od instalacji do własnych agentów. Pisany przez człowieka, weryfikowany z oficjalną dokumentacją VS Code.